What is vBIOS? Video BIOS update
If you have a slightly older video card or just bought a newly released model, this vBIOS article may be of interest to you.
Almost all of us are used to hearing about the motherboard BIOS, updating it to add more features or fix bugs. But did you know that a video card also has its own BIOS firmware?
That’s true, and it also makes a lot of sense as it’s a common motherboard with a lot of specialized power electronics that need to be controlled. In this article we will see what a vBIOS is and its main functions. In addition, we will see why the update is necessary and how to do it safely without breaking it.
What is vBIOS or GPU BIOS?
The vBIOS is responsible for initializing the different components of the video card, such as the GPU and RAM memory, and for managing the power supply systems through the VRM. In your code, you can specify various component clock frequencies, voltage, current, etc. There will be parameters that define and control it.
We can even somehow interact with some of these parameters from a Windows application to overclock or undervoltage the card. Therefore, it will have its own safety mechanisms to shut down the card before a failure occurs.
This firmware is stored on a separate ROM chip from the GPU and resides somewhere on the PCB, just like the graphics card. Although in this case there is no reset function like the Clear CMOS we know. In fact, your PCB also doesn’t have batteries to continuously power certain chips.
Communication between BIOS and vBIOS
Something interesting happens in vBIOS when we analyze its operation, and that is that the video card must initialize its components almost first of all. It depends on this that the computer starts displaying information from booting to accessing the BIOS or displaying error messages.
Therefore, the only thing that can enable vBIOS during boot before the system loads will be the motherboard BIOS. It immediately loads the VBIOS from the ROM to the system RAM and passes the check at boot to turn on the screen during the first boot phase. We can state that at least some Nvidia cards will display information about the brand, model, BIOS version and amount of VRAM memory when starting the PC.
This is very clearly visible on new generation motherboards that have a boot pole of 4 LEDs: CPU, DRAM, VGA and BOOT. If we look at them, we will see that the LEDs light up in a regular order, the last one is Boot, which leads to the screen turning on. Previously, the BIOS would initialize the CPU, RAM, and then the video card, loading the device’s vBIOS to begin processing the image.
Additionally, on a high-end board, we will have the Debug LED, a panel that displays events in the form of hexadecimal codes during operation. Among them we will also have status codes for the video card and its possible errors. Previously, all this was done with more limited and not very intuitive beeps.
How to update VGA vBIOS?
Just like the BIOS on a motherboard, the Video BIOS can be upgraded. It is an equally critical or delicate process that we must perform correctly so as not to render the card useless.
Fortunately, vBIOS updates are not common unless there are models that initially launched with major bugs, such as the Radeon RX 5600 XT. Updates may also be released to add features that were initially disabled, such as the Resizable Bar or performance improvements.
In general, almost all the innovations that manufacturers can bring are implemented in the drivers, not in the BIOS. Updating these drivers will be a much safer, understandable and accessible procedure for all users.
We will see relatively quickly how to update a vBIOS of AMD or Nvidia cards and the available methods available in Windows.
Currently all installers without exception have their own tools and tutorials for updating graphics cards and certain models. We will find utilities and guides for it in the support section of each video card. If we don’t find anything about vBIOS or Firmware in the list, it means there won’t be an update for that particular model.
We will give an example from the Asus manufacturer’s own update, specifically with an RX 5600 XT model. So the first thing to do would be to search for the graphics card on the brand page and access the support section and thus update ASUS vbios.
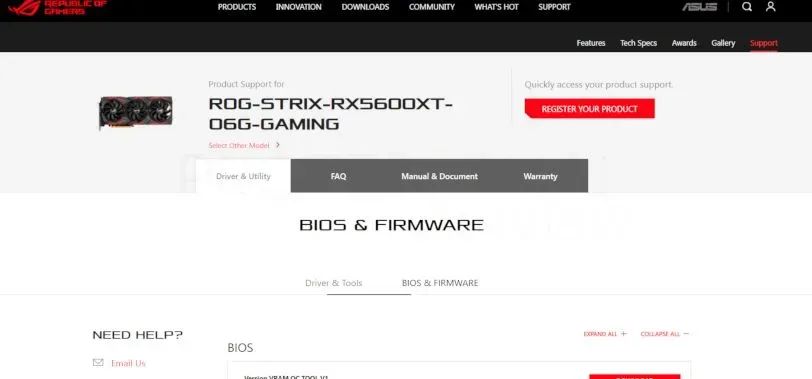
We will find a section where different downloadable vBIOS and information about them are presented, so we download the latest version. Sometimes we may have a version with the OC update and although it depends on the brand we may have another version to leave the video card in the factory default BIOS.
In the case of Asus, the firmware will already be embedded in the update application itself, so we only need to run it as administrator and follow the instructions.

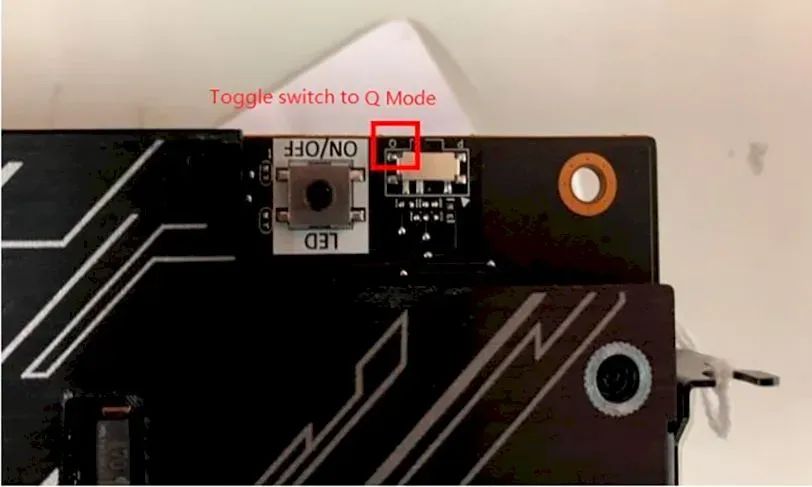
We recommend that you always carefully read each manufacturer’s instructions, especially on cards with Dual BIOS. This means they will have two ROMs that load different parameters for the card to work. You will be familiar with the Q (Quiet) and P (Performance) modes of many high-end models.
What we need to do for these cases is to update the card twice, in P mode and Q mode, using the switch found in these types of models.
Finally, Asus, Gigabyte or MSI explain the update methods for their graphics cards we leave.
Flash vBIOS with NVFlash for Nvidia cards
In some cases, card installers use common applications such as NVFlash or ATIFlash to update their cards’ vBIOS. These methods will be generic so to speak and will support the firmware version available for this card.
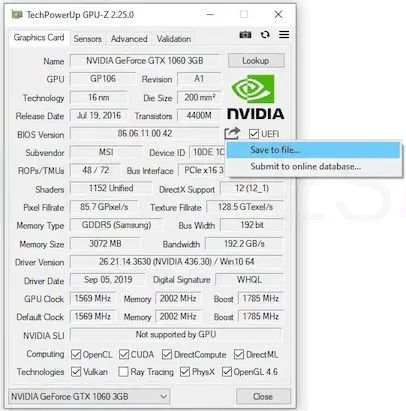
First of all, we recommend making a backup of our video card’s BIOS using GPU-Z. After running the application, we select our special video card below and click the save icon in the upper right corner under the brand logo. We choose save to file…
We use NVFlash, a free application that works in command mode for green brand cards. So we will download and unzip it, we recommend putting it in the root of C: for faster access from the command terminal.
A quick way to save us from putting the access path in the terminal would be to open it directly in the directory. We go to this directory and select Open Windows Power Shell as administrator to display the File tab. If we want to use Command Prompt, the usual method would be to use the command (we’ll follow it): cd C:\ruta\del\directorio\NVFlash
Then we run the application: NVFlash64 --protectoff
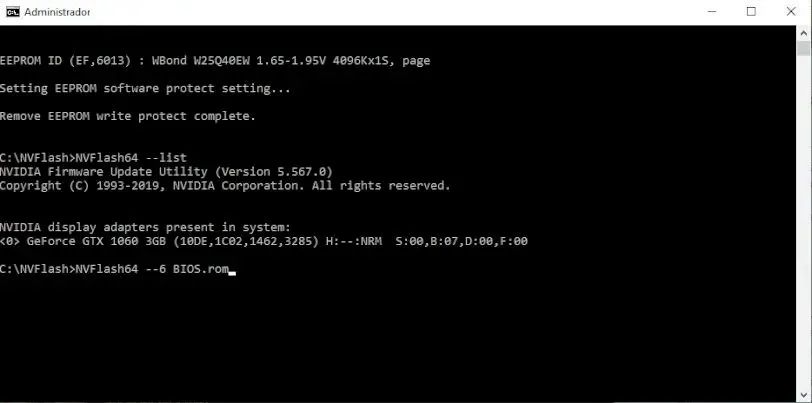
Now it will detect that we do indeed have an Nvidia card and you are ready to proceed. It will be time to take our vBIOS ROM file and place it in the directory where the program is located.
To flash the video BIOS we will execute the command: NVFlash64 --6 nombredelfichero.rom
If the file is compatible, the screen and terminal will flash several times, but we will not touch anything until the process is complete. When it’s done, we’ll restart as the program says at the end, and the changes will take effect.
Update with AMD VBFlash of vBIOS for AMD card
For those with AMD graphics card, the previous method will not work and in this case they will have to use the AMD VBFlash tool formerly called ATIFlash . We can download it for free from TechPowerUp.
As before, we will keep a backup copy of the current BIOS of the video card in case anything happens.
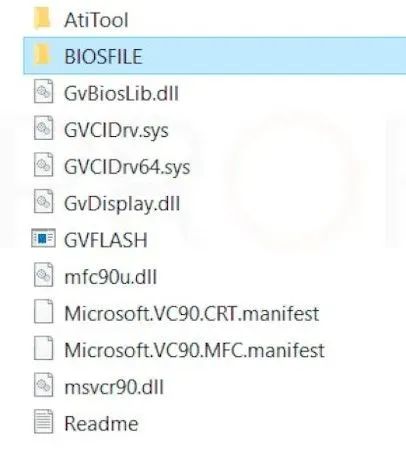
We open the downloaded content and introduce the vBIOS file to be installed to make it more accessible, this normally comes in a BIOSFILE or similar folder. We will have gotten this earlier from the brand’s support website.
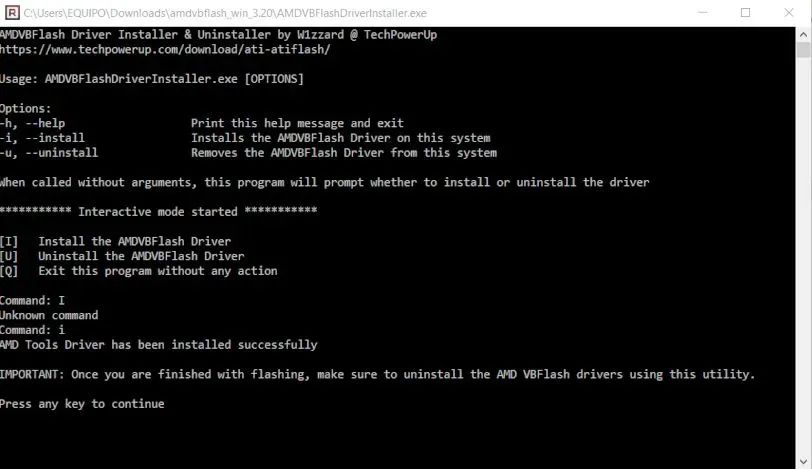
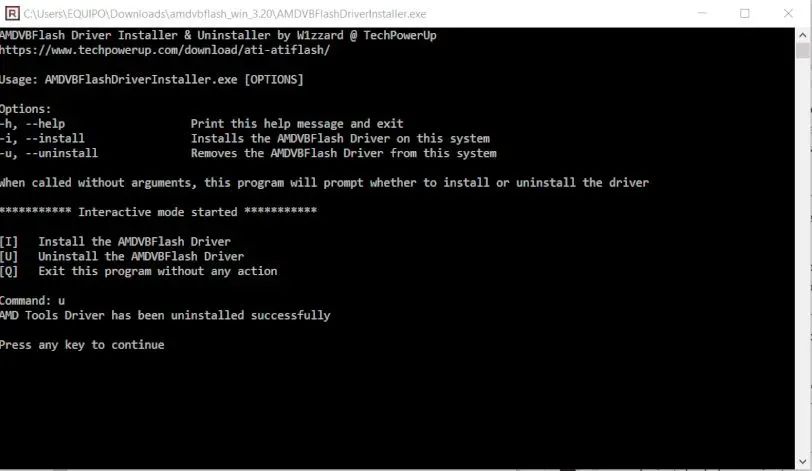
To install the hardware access driver on the system, we will first run the AMDVBFlashDriverInstaller. In a menu that appears in the command terminal, we will press “I” for installation.
Now we will run amdvbflashWin as administrator and if our computer has an AMD card, the application will appear as a graphics window.
The application allows you to save a backup of the current BIOS, although we have done this before. So we click on upload image and look for the new vBIOS file to install.
Once installed, we can verify that they are compatible based on make and model by checking both the current BIOS specification and the new one we will install in the window. So we just have to click on Program to start the process.
After rebooting the changes will take effect and we will have the updated card. All that remains is to uninstall the tool, so we’ll run AMDVBFlashDriverInstaller again, but select “U” as an option in the command terminal menu.
Update vBIOS and BIOS for Resizable Stick
There is one more procedure that new generation card users will eventually have to perform in the motherboard BIOS, not the graphics cards.
And these models have implemented a new function such as Resizable BAR, a technology that opens up the amount of VRAM memory shared with the CPU to have all the available capacity. In this way, the exchange of instructions between the CPU and GPU will be faster and the effective performance of the video card will be increased.
Almost any Nvidia RTX 30 or Radeon RX 6000 GPU will already support this technology in its vBIOS out of the box. Otherwise, a new update will appear in the support section of its brand and we will act as in the previous case.
However, this feature also requires BIOS update on supported cards. If the motherboard is from 2020, we will most likely not get this function, so it will be necessary to download the latest BIOS from our brand’s support section.